Drawflow Tutorial: 2. Automatically Show Nodes When Page Loads
In our first tutorial, we set up Drawflow, created a canvas, and added a simple “Hello World” node.
Now, let’s move forward and explore how to add multiple nodes that are connected to each other right from page load.
This tutorial will guide you through adding new nodes and establishing connections between them.
Method 1: For Simple or Example Workflows
Use this method if you want to preload example workflows that users will delete when they begin to create their own workflows.
1. Add Multiple Nodes
To create connected nodes, we need to add each node to the canvas individually and assign them positions. We’ll add two nodes in this example and position them side by side.
Inside your <script> tag, let’s define these nodes:
// Add Node 1
const nodeId1 = editor.addNode(
  'node1',
  1,   // Number of inputs
  1,   // Number of outputs
  200, // x position
  200, // y position
  'node-class-1',   // Class name (optional)
  {},  // Data (if any)
  '<div>Node 1</div>' // HTML content
);

// Add Node 2
const nodeId2 = editor.addNode(
  'node2',
  1,   // Number of inputs
  1,   // Number of outputs
  700, // x position, placing this to the right of Node 1
  200, // y position
  'node-class-2',   // Class name (optional)
  {},  // Data (if any)
  '<div>Node 2</div>' // HTML content
);
This code will add two nodes labeled “Node 1” and “Node 2” to the canvas at specified positions.
2. Connect the Nodes
With our nodes added, let’s create a connection between them. In Drawflow, connections are established by specifying the output port of one node and the input port of another.
-
To connect Node 1’s output to Node 2’s input, add this line right after the nodes are created:
editor.addConnection(nodeId1, nodeId2, 'output_1', 'input_1');
Here’s a breakdown of the addConnection parameters:
nodeId1: ID of the starting node.nodeId2: ID of the destination node.'output_1': the output port of Node 1 (we used a single output when adding the node).'input_1': the input port of Node 2.
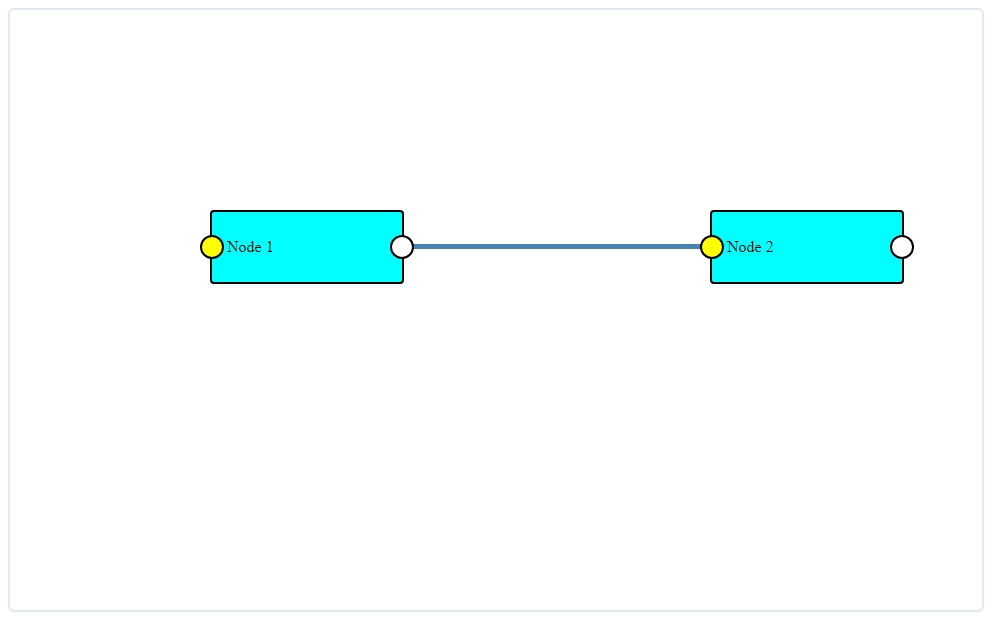
This will draw a line connecting Node 1 to Node 2, creating a visual workflow connection.
3. Putting It All Together
With the node creation and connection code in place, the full page code should appear as follows:
<!DOCTYPE html>
<html lang="en">
<head>
    <meta charset="UTF-8">
    <meta name="viewport" content="width=device-width, initial-scale=1.0">
    <title>Drawflow Demo Hello World</title>
    <link rel="stylesheet" href="https://unpkg.com/drawflow@0.0.60/dist/drawflow.min.css">
    <style>
        #drawflow {
          width: 100%;
          height: 600px;
          border: 2px solid #e2e8f0;
          border-radius: 0.375rem;
        }
    </style>
</head>
<body>
  <script src="https://unpkg.com/drawflow@0.0.60/dist/drawflow.min.js"></script>
  <div id="drawflow"></div>

  <script>
    const drawflowContainer = document.getElementById('drawflow');
    const editor = new Drawflow(drawflowContainer);
    editor.start();

    // Add Node 1
    const nodeId1 = editor.addNode(
      'node1',
      1,   // 1 input
      1,   // 1 output
      200, // x position
      200, // y position
      'node-class-1',
      {},
      '<div>Node 1</div>'
    );

    // Add Node 2
    const nodeId2 = editor.addNode(
      'node2',
      1,   // 1 input
      1,   // 1 output
      700, // x position, right of Node 1
      200, // y position
      'node-class-2',
      {},
      '<div>Node 2</div>'
    );

    // Connect Node 1 to Node 2
    editor.addConnection(nodeId1, nodeId2, 'output_1', 'input_1');

  </script>

</body>
</html>
4. Test Your Connected Nodes
Save your HTML file and open it in a browser. You should see two nodes on the canvas, with Node 1 connected to Node 2 by a line.

Method 2: For User Generated Workflows
Creating each node individually as we did earlier can quickly become inefficient and tiresome.
Fortunately, Drawflow allows you to add nodes and connections on page load using data export and import. This approach is ideal for larger workflows, and workflows where users can create and edit workflows.
1: Define the Workflow Data
Drawflow uses JSON data to structure workflows, including the nodes and their connections. Let’s create a sample data object, dataToImport, that includes multiple nodes and their connections.
Each node in Drawflow requires properties like:
- id: A unique identifier.
- name: A label for the node.
- html: The HTML content displayed within the node.
- inputs and outputs: The input/output ports for connections.
- pos_x and pos_y: The node’s position on the canvas.
Here’s an example of a JSON structure with two nodes that are connected:
const dataToImport = {
    "drawflow": {
        "Home": {
            "data": {
                "1": {
                    "id": 1,
                    "name": "node1",
                    "data": {},
                    "class": "",
                    "html": "<div>Node 1</div>",
                    "typenode": false,
                    "inputs": {},
                    "outputs": {
                        "output_1": {
                            "connections": [
                                {
                                    "node": "2",
                                    "output": "input_1"
                                }
                            ]
                        }
                    },
                    "pos_x": 200,
                    "pos_y": 200
                },
                "2": {
                    "id": 2,
                    "name": "node2",
                    "data": {},
                    "class": "",
                    "html": "<div>Node 2</div>",
                    "typenode": false,
                    "inputs": {
                        "input_1": {
                            "connections": [
                                {
                                    "node": "1",
                                    "input": "output_1"
                                }
                            ]
                        }
                    },
                    "outputs": {
                        "output_1": {
                            "connections": [
                                {
                                    "node": "3",
                                    "output": "input_1"
                                }
                            ]
                        }
                    },
                    "pos_x": 700,
                    "pos_y": 200
                },
                "3": {
                    "id": 3,
                    "name": "node3",
                    "data": {},
                    "class": "",
                    "html": "<div>Node 3</div>",
                    "typenode": false,
                    "inputs": {
                        "input_1": {
                            "connections": [
                                {
                                    "node": "2",
                                    "input": "output_1"
                                }
                            ]
                        }
                    },
                    "outputs": {},
                    "pos_x": 200,
                    "pos_y": 500
                }
            }
        }
    }
}
In this example:
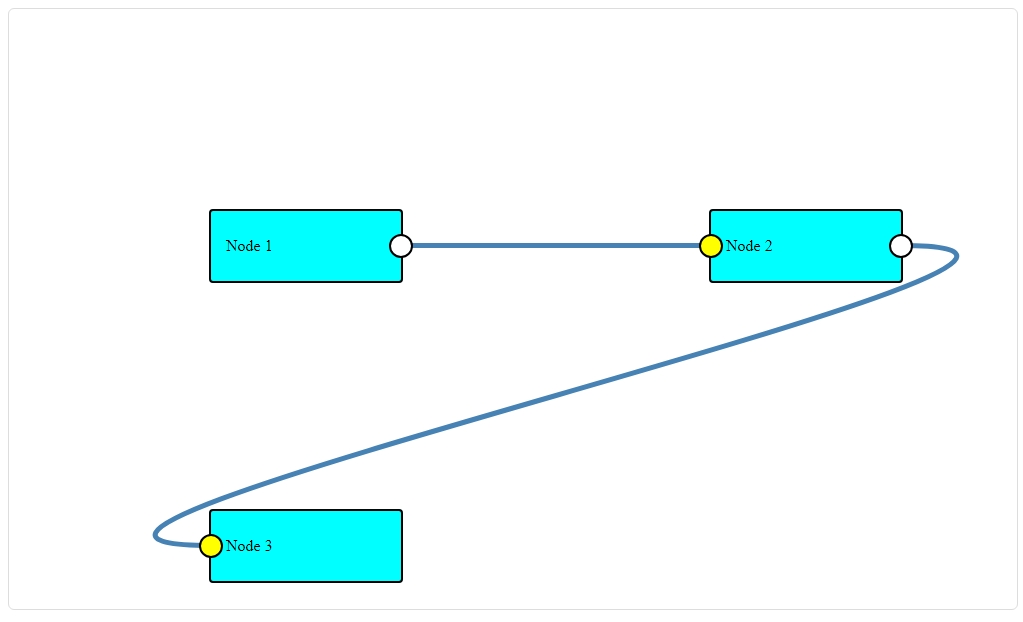
- Node 1 has one output (
output_1) connected to the input of Node 2 (input_1). - Node 2 has one output (
output_1) connected to the input of Node 3 (input_1). - Each node is positioned on the canvas using
pos_xandpos_y.
2: Import the Data with editor.import()
Now, with your dataToImport defined, you’ll initialize Drawflow, then load this data directly into the canvas.
- Set up a basic HTML structure with a Drawflow container.
- Use
editor.import(dataToImport);to load the nodes and connections on page load.
Here’s the complete code in action:
<!DOCTYPE html>
<html lang="en">
<head>
  <meta charset="UTF-8">
  <meta name="viewport" content="width=device-width, initial-scale=1.0">
  <title>Drawflow Workflow with Import</title>
  <link rel="stylesheet" href="https://unpkg.com/drawflow@0.0.60/dist/drawflow.min.css">
  <style>
    #drawflow {
      width: 100%;
      height: 600px;
      border: 2px solid #e2e8f0;
      border-radius: 0.375rem;
    }
  </style>
</head>
<body>
  <script src="https://unpkg.com/drawflow@0.0.60/dist/drawflow.min.js"></script>

  <div id="drawflow" class="drawflow" style="width: 100%; height: 600px; border: 1px solid #ddd;"></div>

  <script>
    const drawflowContainer = document.getElementById('drawflow');
    const editor = new Drawflow(drawflowContainer);
    editor.start();

    const dataToImport = {
        "drawflow": {
            "Home": {
                "data": {
                    "1": {
                        "id": 1,
                        "name": "node1",
                        "data": {},
                        "class": "",
                        "html": "<div>Node 1</div>",
                        "typenode": false,
                        "inputs": {},
                        "outputs": {
                            "output_1": {
                                "connections": [
                                    {
                                        "node": "2",
                                        "output": "input_1"
                                    }
                                ]
                            }
                        },
                        "pos_x": 200,
                        "pos_y": 200
                    },
                    "2": {
                        "id": 2,
                        "name": "node2",
                        "data": {},
                        "class": "",
                        "html": "<div>Node 2</div>",
                        "typenode": false,
                        "inputs": {
                            "input_1": {
                                "connections": [
                                    {
                                        "node": "1",
                                        "input": "output_1"
                                    }
                                ]
                            }
                        },
                        "outputs": {
                            "output_1": {
                                "connections": [
                                    {
                                        "node": "3",
                                        "output": "input_1"
                                    }
                                ]
                            }
                        },
                        "pos_x": 700,
                        "pos_y": 200
                    },
                    "3": {
                        "id": 3,
                        "name": "node3",
                        "data": {},
                        "class": "",
                        "html": "<div>Node 3</div>",
                        "typenode": false,
                        "inputs": {
                            "input_1": {
                                "connections": [
                                    {
                                        "node": "2",
                                        "input": "output_1"
                                    }
                                ]
                            }
                        },
                        "outputs": {},
                        "pos_x": 200,
                        "pos_y": 500
                    }
                }
            }
        }
    }

    editor.import(dataToImport);

  </script>

</body>
</html>
When you load this HTML file in a browser, you should see two nodes on the canvas, with a connection linking Node 1 to Node 2.

3. Export and Save Workflow Data (Bonus)
If you want to save or reload a user-created workflow, you can use editor.export() to capture the current state of the canvas as JSON. This is helpful for workflows that need to be saved, edited, or reused later.
To export the workflow data:
const currentWorkflowData = editor.export();
console.log(JSON.stringify(currentWorkflowData));
This will output the current workflow JSON data to the console, which you can then save and re-import as needed.
In the next tutorial, you’ll learn how to add nodes through drag and drop.

