How to upload and add an image to your HTML Codepen project
If you are having a challenge adding images to a codepen project, this post is for you. I will show you how to add pictures on your codepen project whether you have a free or a Pro codepen account.
How to add images in HTML Codepen
- You should have your image already uploaded online somewhere. You can use codepen pro account or use other services like Github or Drive.
- Copy the URL link to the image on your preferd hosting. e.g.
https://i.imgur.com/1aCAUZA.jpg. - Open the codepen that you want to add the image.
- Write the html image tag
<img src="">. - Inside the
src=""double quotes, add the link that you copied previously so that it look like this.<img src="https://i.imgur.com/1aCAUZA.jpg">
See the Pen Presidential by Elias (@ieliasq) on CodePen.
Your image should now be visible on the Codepen. You can add as many images as you want.
I also found a suitable video showing this process, if you prefer watching a videos instead.
Challenges when trying to add a picture to Codepen project
When trying to add an image to the project you are working on, you will quickly discover that:
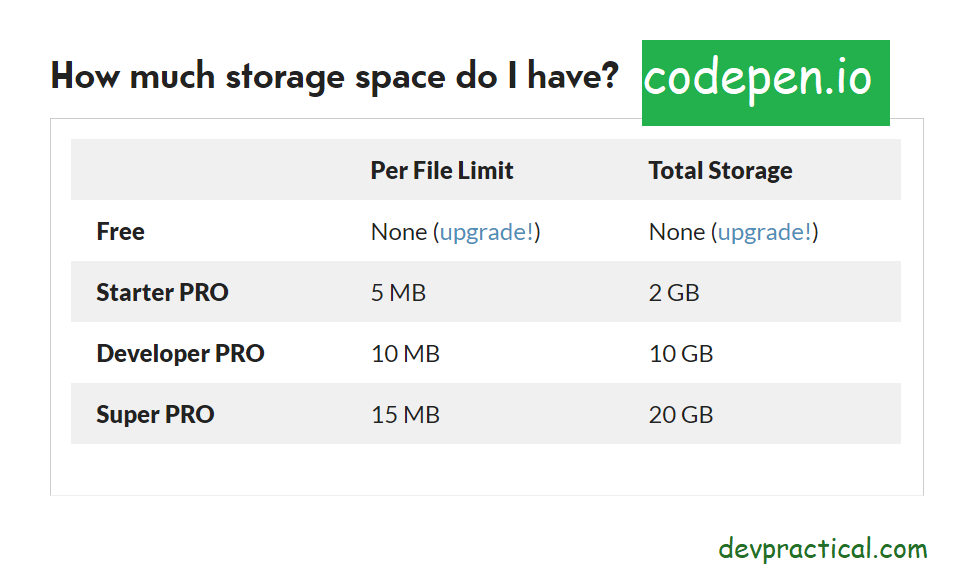
- You can only upload images to codepen website servers if you have a Starter, Developer or Super pro account subscription. This means you have to pay to store your images on Codepen.
- You have a maximum file size limit on individual files that you can upload on Codepen. You cannot upload a file above 5MB, 10MB and 15MB for starter, developer and super pro account respectively.
- You can only link to these images inside of Codepen. So if you want to use these images elsewhere, you will have to download them and then upload them to the new place you want to use them.
- You can only upload 10 files at one go. To upload more files, you will have to wait for the first 10 to finish uploading before adding the second batch. If you have many files you want to upload, this might be a big headache for you. I am sure this is something that Codepen will eventually increase or remove this limit.
- Images on your computer cannot be linked to your Codepen project. You have to upload them online.

So let’s figure out how to overcome these challenges.
1. You can only host images on Codepen using a Pro account.
If you can afford and are willing to pay for a pro account, by all means pay for the account and use it to host your account.
For those who cannot be able to pay for a pro account, or Codepen file storage services don’t suit your needs, you can store your images elsewhere and then add a link to your image. You can use Github or Flickr, or Drive.
how to upload images and select them to use codepen using a Pro account
how to upload images to Github or Flickr
2. The maximum allowed file size on Codepen is 5MB ,10MB AND 15MB
To overcome this, you can reduce the image file size to less than the maximum allowed value. You can achieve this by:
- Saving the file as a
.jpginstead of.png. - Lowering the quality of the image so that they are less than the limit.
You can also subscribe to a higher package so that you have a higher file size limit.
3. The image assets are only link-able through “codepen.io” domain.
If you want the ability to link your images to any other website outside of codepen, I would recommend that you use other services like Github or Flickr, Drive, Dropbox since you won’t be able to do that with Codepen.
4. You can only upload 10 files at one go.
If you have lot of image that you want to upload, you can either be very patient and upload 10 image at a go or use a different service to upload and link the images on codepen.
Not judging though, but why do you want to upload so many images to Codepen all at once?
5. Images not showing in your Codepen project
If images are not showing up on your codepen project, please check to ensure that:
- You are linking to an image already uploaded online. Images on your computer will not work.
- The url link you are using is correct.
- Your HTML
<img src=""/>tag is written correctly.
Sources:

